
Many beginner photographers ask me how to take great night shots, so I thought I would share some simple tips for taking long exposures.
First, here is a list of the gear that will help you get a clear, sharp image:
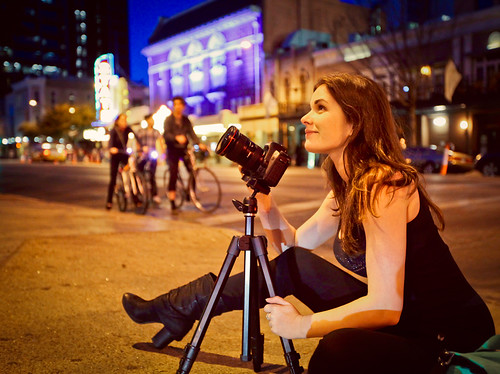
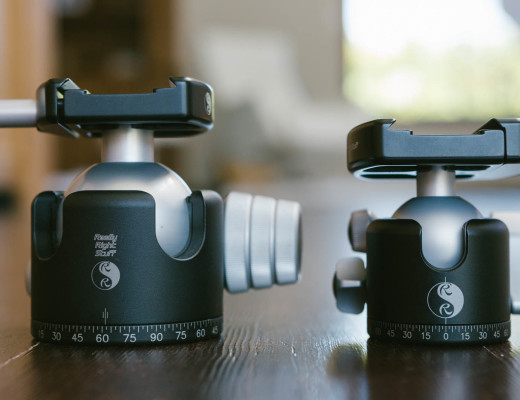
1. Tripod:
You need to keep your camera as steady as possible, so unless you can find a ledge, wall or post that you can set your camera on you’ll need a tripod. I use the Manfrotto 055CXPRO3 Carbon Fiber 3 Section Tripod, with a Manfrotto 498RC2 Ball Head ($500). You don’t need a tripod this expensive, but avoid the $29.99 ones you buy at your local drug store. I had one of these and I nearly lost my camera in the ocean because it was so unsteady and frail. With tripods you pay more for lightweight models. For me this is important because I have a bad back, so I need something that is no more than 4 lbs. But, if you are a big buff photog, you can probably manage something a bit heavier. ;)
2. Remote Cable Release
You want to avoid any camera shake during long exposures, so it’s best if you use a cable release remote to trigger the shutter. I prefer the wired models to the wireless ones because they always work and batteries always have this nasty habit of failing when you need them most. Cable releases are camera specific, so make sure you get the right model. If you don’t have a remote, you can always set your camera to 10s self-timer mode which will give your camera enough time to settle after you press the button and hopefully not cause any movement in your shot. I often use this method and it works fine, but if you are planning on doing a lot of night photography or self-portraits a remote is a good investment.

3. Lens Hood.
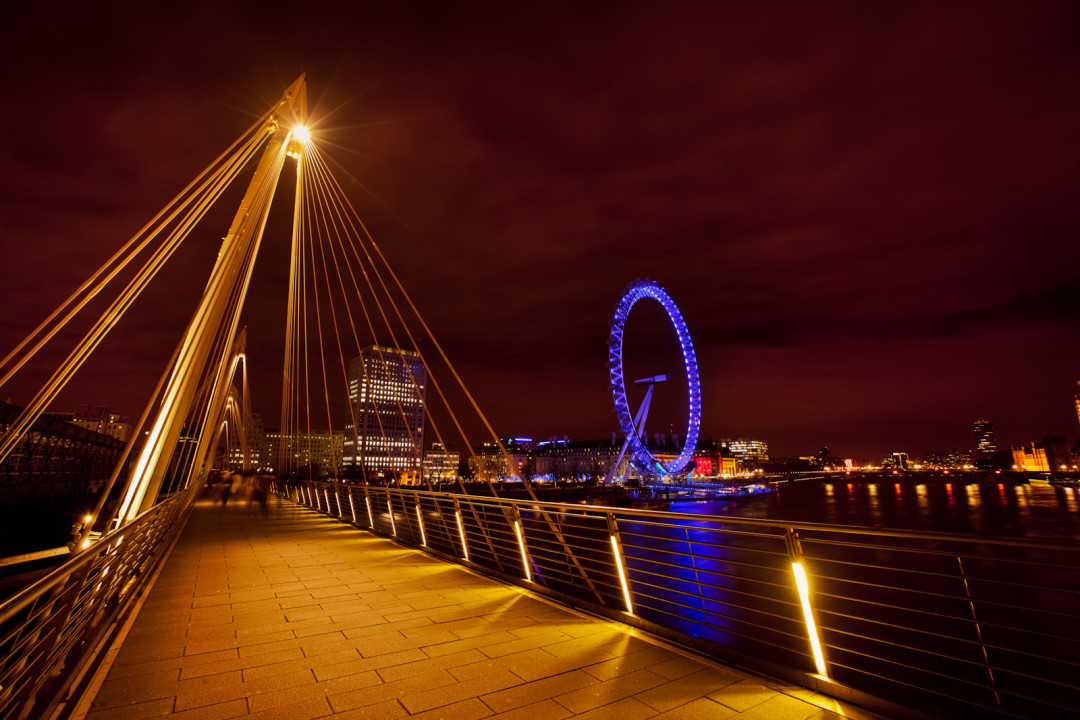
I rarely use lens hoods during the day because I love lens flare, but over-powering street lights can ruin night shots. If you plan on shooting in a well-lit city make sure you bring your lens hood!
4. Flash Light or head lamp or cell phone.
If it’s dark and you drop your lens cap in a bush, or you need to change lenses on a windy beach, or you need to change your camera’s settings in the pitch black, you’ll thank yourself for carrying a flash light! Cell phones are decent, but sometimes they don’t have enough light to see what you are doing. If you want to be hard core, you can buy a little LED head lamp that you can wear during your night shooting escapades. I used one when I was shooting out in the bush in Jackson Hole. Would I wear one in NYC? Not so much. :P
While I can’t give you a specific camera setting to use for night photography because every situation is different, here is a general guideline.
1. Set your camera on Manual (M):
You’ll need full control of the Aperture and Shutter speed of your camera for night photography. If you use your camera’s Auto settings your photos will either turn out too dark, or with a lot of unwanted movement or ghosting of lights. If you’ve never used your camera’s Manual settings, I encourage you to head out one night and give it a try!
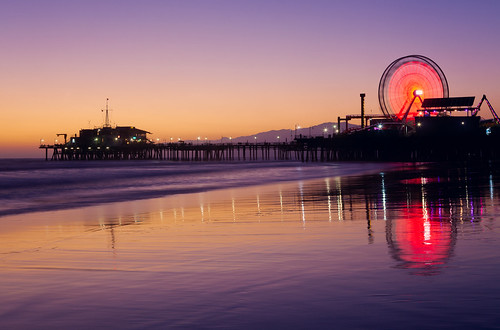
2. Use a shutter speed from 5s-15s.
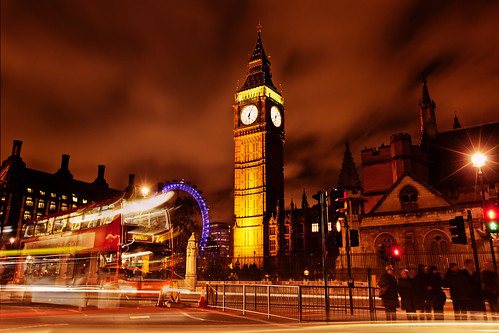
Longer shutter = My photo is too dark, I need more light. I took the above photo just after sunset and there was still a lot of light, so I only needed a 3.2s exposure to get enough light in my shot. 30 minutes later, I needed to increase my shutter speed to 10 seconds to get the same exposure. If it’s totally pitch black, or you want to capture star trails, you may need to use a shutter speed of 30s or more. In this case, switch your camera to Bulb mode. You can trigger when you want your exposure to start and end. I use my iPhone’s timer to keep track of time.
3. Keep your ISO as low as possible.
I always shoot on ISO 100 to get the least noise as possible. Since you are using a tripod you don’t need to increase your ISO to get a brighter exposure.
4. Set your Aperture for the optimal depth of field that you want.
There are two main aperture settings for night photography.
Shoot with your aperture wide open (f/1.4-f/4 depending on your lens). Wide Aperture = More light. Use this if your subject will benefit from a shallow depth of field for example, a lit fountain in front of a building where you want the fountain to be in focus and the building slightly blurred. You can also use a wide aperture if you don’t have a tripod or want to stop any movement in your shot because your shutter speed will be much faster if your aperture is wide. Note: Using a wide aperture will give street lights in your photo a slight halo, so if you don’t like the look of this use a higher aperture.
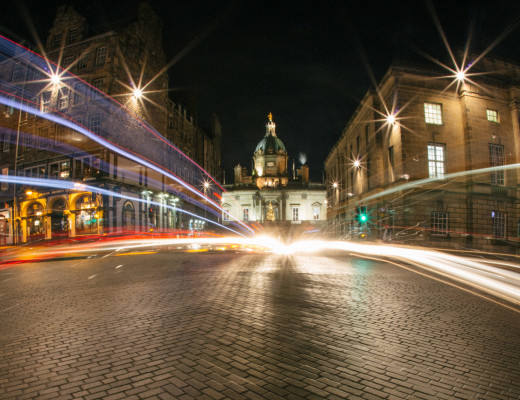
Shoot with a smaller aperture (f/9.0 and higher). Use this if you want everything in focus. It works best to capture landscapes, cityscapes, car tail lights with motion blur, water or star trails. Also, using a smaller aperture will give street lights a “star-like” effect which can yield really cool photos.
If you want to play it safe you can shoot right in the middle around f/5.0-f/8.0.
5. Catch Focus, even in the pitch black!
Most cameras will have difficulty focusing using auto-focus in dark conditions. Auto-focusing can work at night if you your subject has enough light, like a well-lit bridge or building, but more often than not you’ll have to use Manual focus. If you are trying to shoot a dark statue, you can shine a flash light beam on the statue and grab your focus that way or use Live View. To use Live View, simply turn it on, increase your ISO so that you can see your subject more clearly, pick something to focus on, zoom in, manually focus and turn Live View off, reset your ISO settings to 100/200 and you are ready to go. If you don’t have Live View, then you can use infinity focus (the ∞ symbol) on the distance indicator of your lens. Place the dot or mark right in between the ∞ and your focus will be infinite. Some lenses aren’t tack sharp at infinity focus so make sure you test out your lens before taking any important shots.
I hope that this guide helps keep you motivated and inspired to get out and take some night photos. Please share your shots in the comments or on your Google+ page. Can’t wait to see your shots! :)
Thomas S
October 17, 2011 at 12:02 AMVery interesting to read this post, as I went on a nightly photoshoot two days ago, taking the opportunity to shoot in the light of the (almost) full moon.
One thing I learned besides focusing is hard to do when everything is dark, is that using Photomatix afterwards creates a lot of noise.
Thanks for the post, I definitely will use the trick for increaing the ISO and focusing using Live View.
One photo I took with no so much noise is http://kortlink.dk/9sfd
Bruno
October 17, 2011 at 2:06 AMThanks Lisa, a really nice overview of night photography.
Paul
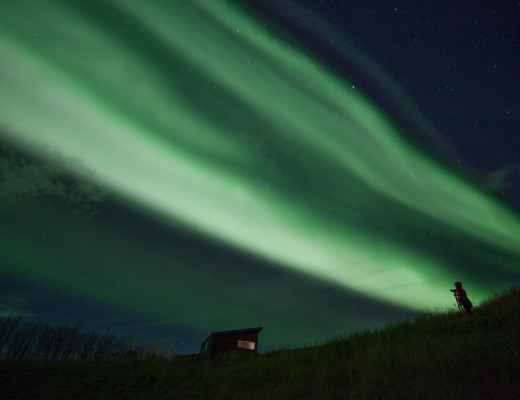
October 17, 2011 at 3:05 AMNice pics Lisa. The one I like best is you on the floor, sometimes you just have to right down there. I have a small plastic sheet for those damp autumn leaves or wet grass.
Have to agree about the cable release, my night pics are much better since I got one, though I have the cheaper RS-80N3 off ebay
Helina
October 17, 2011 at 1:40 PMHey,
I’ve taken night shots before, but I got few new good tips from you. Thank you :)
I love your style, you make beautiful art! :)
My “at night” pictures:
http://4.bp.blogspot.com/_icBhxi52w5A/SsyDybd0-yI/AAAAAAAACjw/TDfvRiWGqbY/s1600/Picture+5733714+copy.jpg
http://4.bp.blogspot.com/_icBhxi52w5A/Sgc2TFiyd-I/AAAAAAAACXE/kfkA8MuoT7w/s1600/Picture+8501+copy.jpg
http://1.bp.blogspot.com/_icBhxi52w5A/SN8g6xjM-uI/AAAAAAAABYc/UouTYqlXiTg/s1600/Picture+10791+copy.jpg
http://4.bp.blogspot.com/_icBhxi52w5A/SN8gs9TPF-I/AAAAAAAABYE/AvdPj8jbuow/s1600/Picture+10845+copy.jpg
Best wishes,
Helina
Lorilee @ Loving Simple Living.com
October 18, 2011 at 7:07 PMWow, great shots.
Thanks for sharing all the info.
Night Photography: A Guide on How to Shoot Long Exposures | fozbaca’s WordPress
October 20, 2011 at 9:17 AM[…] MostlyLisa.com | Photography tips & iPhoneography: https://mostlylisa.com/blog/night-photography-a-guide-on-how-to-shoot-long-exposures/ GA_googleAddAttr("AdOpt", "1"); GA_googleAddAttr("Origin", "other"); GA_googleAddAttr("LangId", […]
camilo
October 20, 2011 at 10:22 AMbeautifull pictureS!! congratulations
Randy
November 7, 2011 at 6:11 AMGreat post Lisa! If I may add a couple things though? Using the MLU function is always a great idea to ensure the sharpest possible shots. Also, using the viewfinder cover to ensure that no light bleeds through the viewfinder to the sensor. Awesome shots as usual. Keep it up!
Heather Clemons
November 15, 2011 at 9:43 AMThis is a great guide! Simple – and it obviously works. I always love how vivid your shots are. Thanks!
Paul
November 16, 2011 at 5:06 PMMLU can be substituted by shooting while Live View is on. It may eat up the batteries but it works the same. Plus you can fine tune your focus as mentioned before.
Eposure_tim
March 5, 2012 at 5:22 AMGreat images and great tips, Thanks!
Any tips for keeping awake on longer exposures? ;o)
Mark
April 16, 2012 at 12:47 AMHey Lisa,
I was just wondering what type if lens hood do you use??
Flower or full cup?? would love to know?
Thanks
PS: great help and amazing photos :)
Greg Linster
May 21, 2012 at 4:51 PMThanks for the tips, Lisa! As requested, you can find one of my better night shots here.
Erick
July 2, 2012 at 10:17 AMThanks, lots of great golden nuggets of knowledge.
Into the Night Photography
September 18, 2012 at 7:49 PMGot to have that remote release timer! Because I do a lot of light-painting, I also use my intervalometer as a night assistant or 3rd hand — setting off the shutter at timed delays, allowing me to walk out and do the painting. -Royce
Stacey
October 26, 2012 at 9:54 AMI’m just starting out and I can’t wait to put these tips to use.
Thank you Lisa
– Stacey
Salem
December 19, 2012 at 4:37 AMHello Lisa,
Just a thought about the dark shots you get when the exposure is too long. I mostly shoot film and in long exposures exposure time has to be increased to compensate for the film “reciprocity failure”, which is usually published in the film data sheet. It states how much modification of time one needs for long exposures. May be there is similar “reciprocity failure” modification for digital sensors. Is there?
Sidhu
December 26, 2012 at 7:50 AMVery well explained awesome
alemar julayco
February 18, 2013 at 9:36 PMHis Lisa nice article, I have been studying photography for 5 months now, currently im trying to practice night and long exposure. I just have a question during focusing to which area do you focus, do you focus on the main subject. i was able to attend a seminar for landscape and normally they focus on 1/3 of the frame is this applicable to night photography. Also you mention in the last part that you can use a flashlight to lit the subject increase the ISO for better view during manual focusing using live view and zoom in in the subject and manually focus, my question is after I zoom in and do manual focus will it have no effect if I zoom back in and compose my image. thannks
Kristina
March 21, 2013 at 8:07 AMHey Lisa,
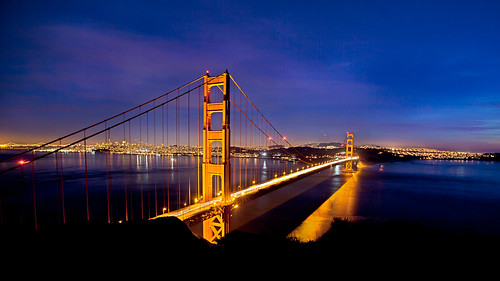
really, and I mean REALLY well explained. You shared a lot of helpful tips not being too afraid to go into details and share your secrets! Most of the guides out there are very vague. I am wondering, in the Golden Gate Bridge the foreground appears pitch black, is that the settings or did you do some post-processing?
I’d really appreciate if you could have a look at this project I am working on together with a photographer and leave us some tips what can be improved. The focus of the photo essay was Vancouver After Dark Cheers!
Anthony
March 22, 2013 at 6:40 AMThanks for the basic tips, motivation is there but knowing where to start is important…obviously. As your style Bettany is not too technical it allows a ‘start’ before modifying things to specific subjects. Me – constellations, but I’d like to include some foreground. Thanks for taking the time to post…and may I say it appears you look good under moonlight too (it’s nice to have a dynamic modern girl giving advice, if it’s ‘with it’ then more people will take advice onboard’)…happy shooting, from an Englishman! We’re all here to learn.
shamsher
June 25, 2013 at 11:45 AMhey a small correction…its decreasing shutter speed frm 5 to 10 and nt increasing it….N thanks for ur guide!
Alberto Gonzalez
July 14, 2013 at 8:46 AMI tried to do some nigth shots in order to capture circulating moving stars on a very dark sky (no moon), I thougth about centering my shot pointing at the Polar star, and having a dark first plane house with some window ligth, rigth in front of my camera; I tought I could perhaps also capture it if I proceeded to paint it with a good flash light. I setted aperture dial at an f. 32, timed it at three hours and thirty minutes. All I got was only a reddish sky and some silhouetted mountains at the horizon, but no stars and no house.
What did I do wrong ?
Bill
November 1, 2013 at 4:15 PMThanks for tutorial. this was in plain english and very informative. It also helps that you are Canon equipment.
Vera
November 25, 2014 at 5:08 AMGreat advices…I already know all of this but I like when someone gets everything in one place to remind me…I’m preparing myself for shots in Salzburg Christmas markets and Salzburg panorama…hope I’ll get some pretty nice photos …Thanks a lot…
Saichovsky
September 7, 2015 at 9:34 AMI tried long exposures at night trying to capture star trails over a small town. A few bright lights appeared too bright in the photo. I shoot using a Nikon D3200, which doesn’t have exposure bracketing. How would you go about taking such a shot without overexposing some parts of the photo?
Jammer
January 6, 2016 at 2:23 PMNo questions.
Just a big thank you!
Rambonp
September 1, 2016 at 9:35 AMThanks for Info,this is very useful !!!!!!!!!!!!!!!!!!
Ramy
December 13, 2016 at 12:10 AMVery informative and interesting article. Thanks!
Maui Photography
November 13, 2017 at 11:39 PMGreat tips! Lucky that I found your blog randomly. I will surely use these tips on my next photograph!