A lot of people ask me how I take such fantastic pictures. I usually tell them I’m just really talented and obviously have an innate gift for “The Arts”. But because I don’t want to come off as vain, I put this emoticon “:p” at the end. :p
To be honest, I still consider myself quite new to photography and always feel humbled whenever I log into flickr and see the incredible photos people are taking. It seems that order to be a good photographer, you have to constantly learn things, some of them difficult, and be, like, creative all the time. Harsh, I know.
So here I am to help push you to be a better photographer with a super helpful photo tip every week until your photos are awesome, or I get bored of teaching you :p
Here Photo Tip #1: Learn How to Use Your Camera!
1. Read your camera manual!
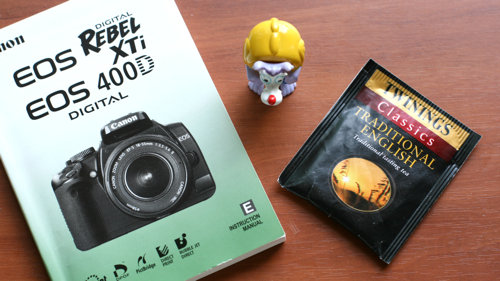
I know it’s boring. I didn’t want to read it either, but knowing how to move around your camera insides and outsides is really important. Nothing is more frustrating than fumbling around on your camera in the field. Where is that darn exposure button? How do I delete all pictures? Crud. How do I display the histogram? What are all these numbers and letters on the screen. Ack!
So get a good cuppa tea or coffee (if you prefer that vile stuff) and sit down with your camera and its manual. Go through all the menus and buttons with your camera. Don’t just read it passively, but actively go through every menu setting and button, camera in hand, taking test shots as you go.
I also recommend carrying it in your camera bag if you are a beginner. If you get stuck on something, look it up. Warning: This process may actually lead to learning how to use your camera as more than just an expensive and weighty electronic necklace.
This brings me to my next point…
2. Never use auto settings. Ever.
I know this is a drastic statement, but trust me on this one, your photos will always look kinda crappy if you use auto settings. That includes the “face” one, the “running man” one, the “mountain” one, the “flower” one, even the “nighttime” or “fireworks” one! Any setting represented by a little cute picture is off limits!
I know that this is a difficult habit to break if you are new to photography. Like most people, I started taking photos on auto settings. After a while, I realized that I had no creative control and I noticed that basic things like focus, exposure, and white balance were all out of wack. Basically, my photos looked subpar and amateur. So I committed a lot of time and effort, and actually learnt stuff about aperture, shutter speed, etc. I know. Crazy.
So repeat after me, “I promise to not use my camera’s default auto setting as a crutch and take control of my photos!”
3. Always set your White Balance
 |
 |
Nothing looks crappier than photos with incorrect white balance (WB). Your best friend will not appreciate looking like a member of the blue man group on her wedding day. Trust me.
The first thing i do before i take a picture is set the WB. I look around, take a few shots and figure out what the kind of colour temperature I’m dealing with ie. overhead tungsten lights, blinding fluorescents, daylight through a window, etc. and then set the white balance to best match what I see.
If you don’t know what to set the WB to when you are out in the field, then test it using that big screen on the back of your camera that lets you preview photos! Take a few snaps using different WB settings, and decide which best matches the colour of light you see. This may seem tricky, but dicerning between cloudy and sunny isn’t really that tough. And with some practice, you’ll quickly be able to identify trickier things tungsten bulbs and candlelight and mixed light… oh boy.
When you are dealing with a mixed light situation ie., florecent overhead lights, daylight coming in through a big window, use your judgement. What looks the best? Get into the habit of analyzing colour and light and experiment with different WB settings in camera. It’s a really easy thing to do, and will save you a lot of hassle colour correcting in post especially if you haven’t mastered Photoshop, Lightroom, Aperture, or “computers” in general.
To learn more, read this article.
That concludes my lecture for today. Give your camera some extra love this week and take a stack of awesome photos celebrating this last week of summer. If you live in Vancouver or England, remember to bring your umbrella!
Thoughts and comments?
Come say Hi on Flickr & stay tuned for next week’s awesome tip!

Kodak Retinette 1A: going retro — kristarella.com
September 2, 2008 at 7:24 PM[…] of the film into a little groove on the reel (didn’t even know the groove was there — RTFM). Some of the film got torn and the whole thing just jammed up after about 15 shots. I tried to […]
Canada’s Sexy Geek explains you how to get the most form your camera : Scrivereconlaluce
September 3, 2008 at 11:15 AM[…] She is a blogger, a model and also a photographer. You can read on her blog (MostlyLisa) some good basic advices about photography: “Read your camera manual!”, “Never use auto settings. Ever.”, […]
Lewis Walsh
September 4, 2008 at 2:15 AMSometimes the semi-auto modes (P, A and S) can get close to what you want but be a little over or under exposed.
My one piece of advice would be to not be afraid of using exposure compensation to correct this. It’s a lot quicker and easier then switching to fully manual (M) and trying to get it perfect that way.
I used to think going fully manual was a kind of goal that as an amateur I should aspire to. Now I realise it’s just a mode that has it’s place when I need it.
Stu
September 8, 2008 at 12:22 PMI like this post, I’m one of those will read up on that setting later, for now i’ll use auto settings, reading this has inspired me to pull the old finger out :P woop woop!
Great site! Super cute and likes photography and macs = ace :D haha
James
September 10, 2008 at 8:16 AMGood post. It’s also great to be reminded how the rules for good photography are so close to the rules for good videography. (I do video production for a living.)
P.S. Love your blog BTW! :)
Brandice
September 21, 2008 at 7:51 PM1. Great write-up… I want to eventually get a much better camera and really learn to use it.
2. Whyyyyy are you drinking Twinings? If you send a mailing address via email (monkey at brandice dot net), I will send you good tea. I can’t be a tea podcaster and allow such a spiffy person to drink such tea in good conscience… lol. ;)
Sascha Vogt
February 10, 2010 at 5:05 PM@Mostly Lisa:
IMHO you are right, for the newbie who just takes his memorycard to the drugstore to get some prints or uploads them to somewhere, white-balance is a thing that really matters.
And for the more advanced photographer I think it’s better to do it right in the first place.
Great article!
Sascha
6 Ur Camera Sites | Digital Cameras Online
July 12, 2011 at 9:39 AM[…] Learn How to Use Ur Camera | MostlyLisa.com | Photography tips .Aug 27, 2008 Lisa is your camera a 400D or a 450D? My 450D says XSi in the bottom whereas the image above has a […]
Sophie
October 29, 2011 at 9:33 PMHi lISA!I’m 12 years old and am striving to be a photographer. Thank you for all your posts!~i have been following you {{{stalker-i know!}}} for the past few weeks and am loving every minuite of getting to know my camera better! Just want to ask- how do i set RAW on my settings? I have a canon EOS and am curious of how my shots will turn out if i use RAW. Thanks….
SOPHIE =P ♥♥♥
Mostly Lisa
October 30, 2011 at 8:54 PM@Sophie — hi! nice to meet you :) You can set your photos to RAW in your main menu under quality settings. It’s a little bit different from camera to camera so just look up “quality seetings” or “RAW” in your manual. They are all online on this site: http://eosdoc.com/manuals/