Posts Tagged ‘ANPW’

How to Shoot a Panoramic with Scott Stulberg

Oct 24 2008


Even professional photographers don’t get the perfect shot straight out of the gate. The difference between professionals and amateurs, is that pros don’t give up until they’ve got that perfect shot. They make get frustrated, but they try and try and try again, even in the freezing cold dawn with their feet in mud in the wilds of Wyoming.

I found it very insightful to watch Scott Stulberg fail his first two attempts of taking the panoramic, but by using different zoom and exposure settings and a certain level of patience, he was able to get a perfect shot. Here is Scott’s panoramic of Oxbow Bend at the Aperture Nature Photography Workshop (taken minutes after the video was taken):

pano1_oxbow
Photo by Scott Stulberg.

A review of Scott’s tips for taking a panoramic:

  1. Use a solid & level tripod
  2. Check to make sure your entire shot is level and all your subject is in your frame
  3. Shoot on Manual so that all your settings stay constant
  4. Use a cable release
  5. Overlap each shot by 20%
  6. Stitch photos in post

I think the moral of the story is that you should never give up on a shot, especially a complicated shot like a panoramic. Try a different angle, focal point, aperture, exposure and see if you can make the shot work! Hope this inspires you to go out and take some panoramic shots yourself.

What are your experiences shooting panoramic shots?

Intro to Astrophotography

Oct 17 2008

Mostly Astronomy! Look at those stars!

My first time shooting the stars was a memorable event. I’ve always been facinated by stars. My childhood room was plastered with constellation, galaxy and astronomy posters. I even had the main constellations replicated in glow-n-the-dark stars on the slanted ceiling above my bed. I was seriously into stars. So much so, that I only alloted a small 6×6″ piece of wall for Matt Damon.

On the last day of the Aperture Nature Photography Workshop, I was elated when Scott Stulberg suggested that we decided to stay long into the night to capture some astronomical pictures. We did have to forgo dinner and general warmth, but it was well worth it.

The group was lead by Scott Stulberg & Martin Gisbourne, an experienced astrophotographer who guided us through the sky and found a perfect spot right below the Milky Way for us to set up our gear.

It’s really important to set up your tripod and camera and find your frame and focus point before it gets dark, because when it’s dark, you can’t see a whole lot through your view finder. I learnt my lesson by finding the edge of a huge tree in a lot of my star pictures after the fact. I think the tree decided to move in my frame just to spite me. Jerk.

Also, if you don’t have a headlamp flashlight, get one. They are essential for early morning or night shoots. Trust me, mounting a camera on a tripod or changing a CF card in the dark is not a good idea. Also, the iPhone flashlight app does not give sufficient light for finding anything really. Tried. Tested. And true. And dress warm, like a Michelin man amount, as it gets a wee bit chilly waiting for those 30s exposures.

As soon as the sky was dark, the group started shooting. It was really tough to get the stars in focus and the photos weren’t coming out the way we wanted. Scott Stulberg and I ended up breaking from the group to do some crazy light painting of the Mormon barns which I”ll talk about in another post. When we came back we ran into legendary Nikon photographer, Dave Black, and his pals shooting some spectacular shots of the stars in a completely different position in the sky. We asked them how they were getting such clear shots. He said that the trick is to set your focus to manual, on infiinite focus, positioning the cursor right in the middle of the ∞. Then we had the magic formula:

Aperture at f/2.8,
Shutter speed at 25-30s,
Manual focus set to infinite focus,
ISO cranked to 3200 to 6400 (for those of us with Nikon D3s).

The only problem was, Scotty’s camera was outta juice and he forgot his spare battery (tsk, tsk) and my lil Xti couldn’t hack it, so Richard generously loaned us his Canon 1D Mark III to get this magical shot.

Most of us were shooting with wide-angle lenses, as wide as a 14mm fisheye, to get in as much sky as possible. But if you’ve got zoom, use it, especially if the moon is out and aboot.

I hope this has given you the inspiration to go out and take your own star shots. If you get any good ones be sure to link them in the comments!

How to create soft light using diffusion & reflection

Oct 9 2008


Video by Redpilot Media.

Learning how to correctly using diffusers and reflectors will make a huge difference in your portrait photography. But don’t just take my word for it… Watch and learn from this footage I captured of Scott Bourne and Scott Stulberg demonstrating how to use diffusion and reflection to get nice, soft light on ANPW contest winner, Cathy Chung at the Mormon Row Barns in the Grand Tetons.

Travel & stock photographer, Scott Stulberg never leaves home without his 32″ Photoflex diffuser and soft/gold reflector ($40). And if you’ve seen Scott’s photos you’ll know that he is a master at lighting his subjects.

Reflector/diffuser combos are light, portable, and fit nicely in most photobags, especially the Lowepro CompuTrekker backpack. If you have a smaller bag you can always get a smaller bounce! They come in loads of different sizes and are pretty affordable… mostly.

Like all things associated with photography, reflectors can get pricey and I understand that you might not have the bucks to buy a decent bounce. So if you are on a shoestring budget, head to your nearest craft or Staples and buy a few white board for $2 each. Then, put your subject in the shade so you don’t need to diffuse the sun. Done. cool.

I have a bunch of whiteboards lying around my apartment that I can quickly grab for indoor macros or for quick shoots on the fly. I still use them on shoots and find them really handy and quite durable.

Lisa behind the scenes set-up
Using a whiteboard as a bounce is cool and cheap.

Now go take pictures and be merry!

Aperture Nature Workshop (Tetons) Day Two

Sep 29 2008

The Iconic Oxbow Bend, Grand Teton National Park

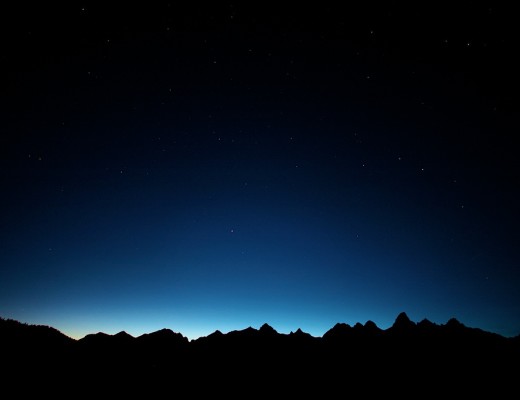
The ANPW contest winners, Pros, and I were up bright eyed and bushy tailed this morning at 5am, hoping to catch a beautiful dawn in Grand Teton Ntl. Park. The actual workshop *learning Aperture* was to begin later, but at first light, the students split up into two groups to take some pictures.

I trucked it to Oxbow Bend with Pros: Scott Stulberg & Steve Simon; and contest winners, Richard and Bryan. Everyone came prepared for the cold, except Steve, who was a bit whiny and runny nosed, kinda like a baby who’s had their lollipop ripped outta their tiny little hands by a mean photographer trying to capture pure misery and tears. I guess Steve is like me, you know, “they mostly come out at night… mostly” aka morning is for sleeping, afternoons are for eating breakfast.

Scott was determined to get a great shot, so we headed down this step muddy hill to the bank of Snake River. And then we set up our tripods, then everyone laughed at mind and pushed me in the mud… well they didn’t exactly push me in the mud, but I bet they wanted too,. Jerks. *huff* Then we pointed our lenses at the iconic view and waited. And waited.

ANPW: Richard, Steve Simon, Bryan, Me, Scott Stulberg

No interesting light seemed to be happening on Mt. Moran, but suddenly a slight miss of fog started floating just above the water line behind us. No one else was worried about the immediate appearance of Death Eaters, but I methodically started chanting the Patronus Charm in my head and heart. As the fog began to roll, As the fog began to roll, Scott jumped and “yahooed”, changing his camera direction to started shooting the rolling fog and silhouetted trees against the wispy, pink sky.

Oxbow Bend foggy at dawn, Grand Tetons

It was a great lesson in always looking for shots, even when you are waiting for a sunrise to happen, look around, there maybe a great shot just waiting to be found like, a silhouetted bird in the distance, or a line of photographers tripods all in a row, or even interesting shots of reflected trees in the water.

Everyone was carefully switching lenses near the water, and Scotty reminded us to always keep one hand on your tripod near water. He has tragically lost two cameras in the water, so let him be the lesson for all of us.

Scott Bourne lead Catherine and Rob to Schwabacher Landing, but immediately left when no clouds were present because without clouds, landscape shots fall a bit flat. So, they headed up the road past the landing at Teton Overlook and grabbed some amazing panoramic shots of the Southern Tetons. Rob disappeared from the group with Martin aka the “Aperture Guru” for a while and ran into a crazy one horned elk.

After breakfast, the workshop got in full gear at the beautiful Jackson Arts center where Martin blew our minds with the dynamic power of Aperture. We imported our images, learned how to compare and select our favorites, and generally found out that Aperture can do most of the things we used to do in Photoshop, but it’s waaaay less complicated. I’ll do a dedicated post on Aperture in the next few days so you guys can see how cool it is.

What photo management & editing application do you use?

ANPW in Grand Teton National Park: Day One

Sep 24 2008

Schwabacher landing, Grand Teton National Park

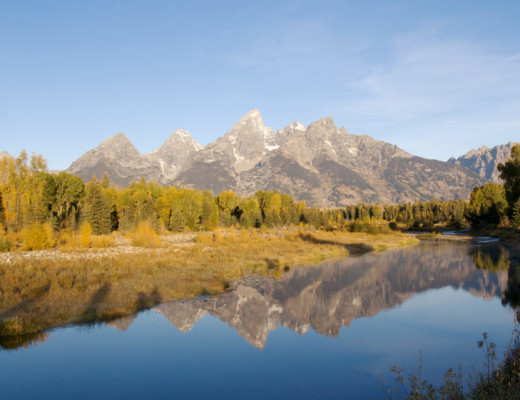
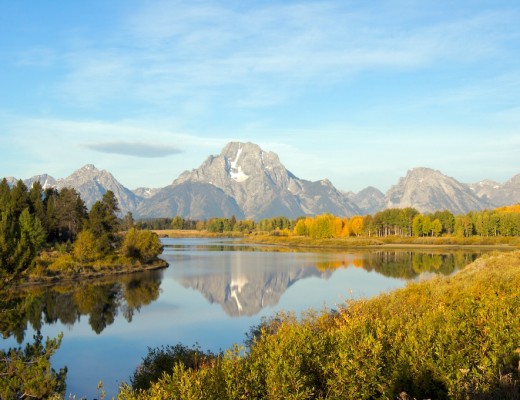
Yesterday I arrived in the small Mountain Resort town of Jackson Hole, Wyoming. I couldn’t help “oohing” and “ahhing” at the spectacular view of the mountains, winding rivers, and the gorgeous colours of the changing leaves as the plane descended over the Grand Tetons. 

Scott Bourne was worried that we might miss the the fall colours, but he couldn’t have picked a better week for the Aperture Nature Photography Workshop. The weather is perfect, the colours are spectacular and the wildlife is abundant — in fact just after arriving we saw a huge herd of Bison saunter across the road, munch on some grass, and then cross back over to the same spot they came from. Scott amused us by vocalizing the inner dialogue of a massive, sleepy looking guy. I believe his name was “Wilber”.

Since my arrival,  Scott and I have headed out on a sunset scouting mission at Oxbow Bend and a dawn shoot at Schwabacher landing. I’m not gonna lie. Dawn is freezing and early. Today it was around 25°F (-4°C) and I was way underdressed. Even with three layers I was c-c-c-cold. Scott loaned me a jacket and gave me these little heat packs that I put in my gloves which helped a lot. 

After the sun came up, we scouted the Mormon Row barns that are surrounded by tall grass and slender birch trees and framed by the Tetons. Brilliant.

Morman Row Barn black and white

I have to admit, I have never shot any nature this iconic, and it is a bit daunting trying to take a great and unique shot of something that has been photographed a million times. As a beginning nature photographer, my main goal is just to soak up as much knowledge from the pros as possible and try to do these impressive landscapes justice.

Tomorrow the entire group is heading out at dawn to catch the morning bliss. 5:00am start for me :(

*Interesting note: Only one other person, other than myself, who is shooting Canon. Has Canon really dropped the ball? I’m really interested in what you guys are using.

What camera are you shooting with: Nikon or Canon? And why?