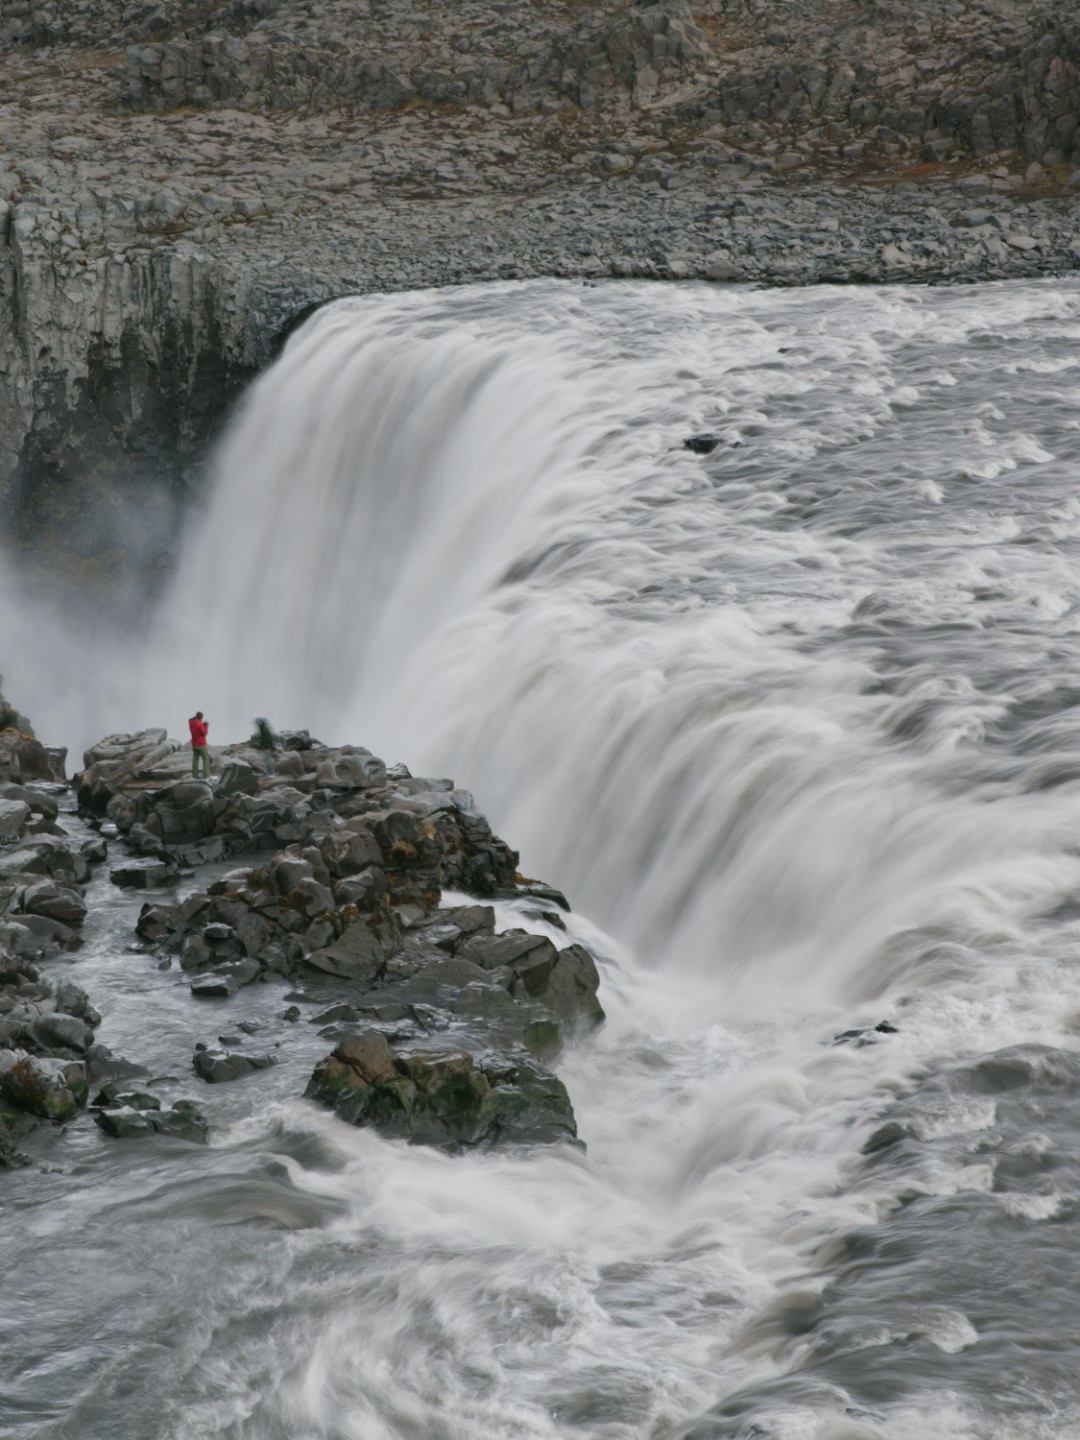
Multiple photo sharing with Camera+

6 Comments
Feb 24 2011

Sharing multiple images with Camera+ to Flickr, Twitter, Facebook & by email is a snap. Here’s a video detailing everything you need to know to share your shots to your favourite social sharing sites!

16 Photography Project Ideas to keep you shooting every day!

53 Comments
Jan 21 2011

Taking a photo everyday can be a daunting task, but as I look back over the last 20 days worth of shots I’ve taken for my Mostly365 challenge I am really proud of the results. To keep everyone inspired I’m giving you 16 photo project suggestions for your 365!

1. Self portraits

Day 15: Selfie + 5DMKII
50 f/1.4, 1/30 @ f/2.8, ISO 640.

Give people a glimpse at the artist behind the camera and take a self-portrait. You can do a classic camera-in-hand mirror snap like mine, or get creative and put your camera on a tripod, set a timer, and run in a wheat field. There are so many options for creative shots and the best thing about you being the model is you can take your shot whenever you like and take as long as you want snapping it!

2. Moon shots

Day 17: I have a dream... Moon over the Bay Bridge, San Francisco
Bay Bridge, SF. 5DMKII+ 100mm f/2.8 L, 1/40 at f/8.0, ISO 500.

There are many faces of the moon and almost all of them make for spectacular photos. If you happen to own a long or telephoto lens put it to good use and grab some stunning shots. If not, consider renting one for your dSLR and go on a special nighttime shoot and capture both the moon and stars. You can even share the rental cost between friends and make a fun night of it.

You’d also be surprised at the shots you can get with your camera phone. Just make sure you prop your phone on something stable while you take your shot.

3. Nature Macros

*silence*
Dew drops on grass.

There is so much beauty out there — leaves in puddles, dew drops on grass, snowflakes on tree branches. Head outside and capture all the little details of nature. Try shooting with a really shallow depth of field (f/2 and lower) to get dreamy artistic shots.

4. Portraits

*i found you*
5DMKII, 85mm f/1.8, 1/200 @ f/2.8, ISO 100.

I am most passionate about taking portraits. From candid street photos shots, to strobe light lit creatives, to magic hour back lit shots, the possibilities are endless. The only problem is you need a subject. If you are blessed with an understanding and patient partner or family member, start practicing taking portraits of them. If you are feeling a bit more bold, you can always head out on the street and try to get some candids of people walking by or even ask strangers to pose for you.

If you are looking to photograph the attractive sort then you can try finding a model through ModelMayhem.com (more tips on photographinc  models here) or pester some of your good-lookin’ Facebook friends. Almost everyone wants a great Facebook profile shots, so offer to give them a nice shot for their time. More tips on taking great portraits.

5. Fun Macros

Day 13: Mini Michael Bay Movie Still
5DMKII+100 f/2.8, 1/200 at f/4.5, ISO 125 + 430EX  double CTO gel.

During bad weather days, dig around in your house for a fun little toy, keepsake or gadget to snap. You can light your subject with strobes to get a bit more creative, or just position your toy in front of a large day lit window and get great natural light.

6. Musical Performances

Day 1: Florence + the Machine NYE at the Cosmopolitan Las Vegas
Florence + the Machine NYE at the Cosmopolitan, 1/60 at f/3.2, ISO 1600.

Every time you are out at a show grab a shot. Taking photos at concerts was actually how I started working as a photographer and all I had was my little Canon Rebel Xti and the 50mm f/1.4. Often, you aren’t able to bring dSLRs into concerts, so make sure you can before you head out. If you aren’t allowed to bring your gear,  try to grab a shot with your camera phone or small point and shoot.

7. Your City’s Landmarks through the Seasons

Day 18: San Francisco Union Square Heart
Union Square heart, SF. 16-35mm, 1/80 at f/4.0, ISO 4000

Every city has it’s famous landmarks. Set a goal to capture 10 of most interesting over the course of the year, and take a shot of each landmark during the 4 seasons. Imagine a a collection of shots of the same statue during fall, winter, spring and summer seasons. For more variation, you can take a shot during the day, night or sunrise and sunset. It’s always good to have your camera on you whenever you go out in your city, so that if you see a good lighting situation you can grab a quick shot!

8. Bokeh shots

Day 3- Snap!

Bokeh shots are always fun to shoot whether you set up little lights behind your subject like I did here or just use what’s in your environment. This is another great project for a rainy day. You can also get great bokeh with street or building lights at night.

9. Architecture & Building shots

Gorgeous Interior of The Plaza Hotel, NYC
The Plaza Hotel, NYC. 5DMKII, 16-35mm f/2.8, 1/125 at f/3.2, ISO 4000.

Head to your local museum, parliament building, or city sites with interesting architecture. A wide angle lens from 15mm to 35mm is ideal for this type of photography. Most kit lenses fit the bill. Obviously a really wide angle like the 16-35mm or even a fish-eye yield the most interesting results. But, if you don’t have a wide angle lens, then focus on capturing the details. Close-ups of pillars, doorways, or statues can make cool shots.

10. Landscapes

Oxbow Bend foggy at dawn, Grand Tetons
Oxbow Bend, Grand Tetons. Xti, 7s at f/, ISO 100.

If you live near nature or are taking a trip out of the city then make sure you take some shots of breathtaking landscapes. Old roads winding through snowy fields, mountains jutting up into cloudy skies, or majestic trees lining a sunken vallies all make great photos. Pay attention to your composition and look for “S” shapes in rivers, paths, and rocks.

11. Raindrops on windows


Rainy day in SF, iPhone4 processed with Camera+.

Raindrops on windows make really cool and interesting shots. You can get really creative with these shots so really stretch your imagination and see what you can create.

12. Food Photos

Ginger & Polenta Waffles

It may be slightly annoying to your friends and family, but snap a shot of your food before you eat it, especially fancy foods and deserts. Mmm. Chocolates :) Try to light your shots, either by placing the food in front of a nice bright window, or with speed lights if you have them, or just turn on some ambient light and use a nice low aperture lens like the 50mm f/1.4. If you are in a really dark restaurant you can also try moving the candle light close to your food to get a bit more light.

13. Pet Portraits

Leo's Ozzie
Leo’s Ozzie, Xti, 1/100 at f/4.0, ISO 100.

Pets are often easier to shoot than most people. Plus, they whine less and can be bribed with snacks. Here are some tips to get great pet photos.

14. Sports & Action shots

Felions at BC Place
CFL Felions, 5DMKII, 15mm f/2.8, 1/25, f/5.6, IS0 320.

Whether you are at at a World Series showdown or a little league game, there are amazing sports photos just waiting to be taken. Freeze the action with a fast shutter speed and a long telephoto, take a tilt-shift of the entire stadium, or snap a fish-eye shot of the distracting cheerleaders at the game like I did :P If you can’t make it to the Superbowl, head to a local sporting event or even down the street to the nearest park. I’m sure you can find some impromptu soccer match for some great action shots.

15. Sunsets

iPhone 4, edited in Camera+.

From cityscapes to silhouetted figures in front of a sandy horizon line, everything looks magical at sunset. What’s great about sunsets is that every camera can capture the magic . I shot the above photo with my iPhone. :)

16. Night shots

My Birthday Night view of Golden Gate Bridge, San Francisco
Golden Gate, 16-35mm, 10s @ f5.0, 1SO 100.

Grab your tripod and shutter release and head out into the night to take some stunning night photos. Take long 15s exposures of cars whizzing by creating trails of light, or ghost-like movement of people walking by dark buildings, or bright neon city signs. If you plan on doing regular night photography, you might want to invest in a small headlamp or LED flashlight to hemp you find your camera buttons in the dark.

Hope that this list helps keep you motivated and inspired to keep snapping a daily photo. Not every photo has to be a masterpiece. Remember to take photos that remind you of your daily life and the little things that make you smile.

If you haven’t already joined my Mostly365 project feel free to jump in anytime! I can’t tell you how happy I am to see your shots everyday. Getting a glimpse into the lives of so many photographers from all over the world is a wonderful thing!

I am also tweeting daily suggestions and showcasing some of the best 365 shots each day, so be sure to follow Mostly365 on Twitter.

Mostly365: Share a photo with the world every day!

49 Comments
Jan 1 2011

It takes 10,000 hours to become an expert in a field, and in the world of photography that roughly translates to about 100 pictures a day for about 5 years. It sounds daunting, but if you keep it light, stay passionate, and shoot what you love to shoot, you’ll look back one day soon at an incredible portfolio of work that is all you.

This year, I am encouraging everyone to shoot and share one photo a day for 365 days. To help you with this challenge, tap tap tap and I have created Mostly365.com — a new website where you share your daily photos with the world with one tweet.

1. Take a Photo

Snap a pic with any camera that you have access to. It doesn’t matter whether it’s a state-of-the-art dSLR, your cell phone camera, or $10 toy camera, the important thing is that you start taking more pics!

2. Share it

Post your pic to one of the many sharing sites and tweet it using the #mostly365 hashtag. Here’s the big list of all the services we support:

You can even just tweet with a link to a .jpg image.

Two years ago I started a 365 project on Flickr and after less than 2 weeks I abandoned it. I felt overwhelmed with having to take a photo everyday and didn’t want to share pictures that weren’t “amazing” in my eyes. What I’ve learnt over the last two years is that every photo you take, good or bad, is a stepping stone to becoming a great photographer.

The beautiful thing about photography these days is that anyone can access the tools to take great photos. You don’t need professional photography gear or school-taught knowledge to capture life’s beauty. All you need is the passion to get out and capture life with through your lens and the courage to share it with the world.

I want Mostly365.com to be a fun and inspirational place where you can share your photos, stay motivated to keep shooting, and connect with other enthusiastic shutterbugs. The most important thing is to have fun! If you miss a day, don’t get down on yourself, that’s why we call it Mostly365 ;)

Follow Mostly365 on Twitter.
Join the Mostly365 Group on Flickr.
Join the Mostly365 Group on Facebook.

Happy Holidays!

5 Comments
Dec 25 2010

Neiman Marcus Christmas Tree, San Francisco5DMKII + 16-35mm f/2.8, 1/30th at f/3.5, ISO 400

Happy Holidays Everyone! Best wishes for a Happy 2011!

I wish everyone an inspired new year full of magical photo adventures. Keep shooting and never lose your sense of wonder and passion for taking great photos that are meaningful to you! =)

Anatomy of a photo: San Francisco Bay Bridge Rainbow

49 Comments
Dec 24 2010

San Francisco Rainbow over the Bay Bridge 5DMKII+16-35mm, 1/80 @ f/8.0, ISO 125.

Mother nature is on fire these days! As a follow-up to Tuesday’s gorgeous lunar eclipse, I was fortunate to catch a shot of this spectacular end-to-end rainbow over the Bay Bridge. Since there is so much chatter about it being real or fake or completely imagined, I thought I would share the anatomy of  how I took and processed this shot.

When the rainbow first appeared it was quite faint in the middle. I actually grabbed my iPhone first and started snapping shots.

Over the next few minutes, the rainbow grew stronger and formed a complete end to end rainbow across the sky… I grabbed my 5DMKII and started furiously snapping away at around 1/80 at f/8.0 ISO 100 with my beautiful 16-35mm lens. After the rainbow faded, I imported the photos into Lightroom.

I always use compare mode in the library to view the images in side-by-side comparison. It makes it much easier to pick the best shot, which in this case was the one on the right with the most sunlight and vibrant rainbow.

After choosing my favourite, I did basic RAW processing in Lightroom. Straight out of the camera, RAW images look flat — lacking contrast and saturation of colours. RAW images do not represent what your eye sees, which is why you have to process them to bring out details, contrast, and saturation of colours. For this image, I wanted the contrast to be quite heavy. I increased the contrast to +100 so that the shadows of the building would stand out in the water and the clouds in the sky would be more distinct. I also increased the vibrance to +30 to liven up the entire image and make the rainbow look more like what it did in real life.

After I pulled a bit of colour and contrast into the photo, I exported the file into Photoshop (command+e). Immediately, I noticed all of the lovely rain splotches and streaks from the window, including a giant dark spot in the middle of the rainbow. I used the healing and clone brushes to zap those splotches.

The streaks were hard to completely clean up, but I used a fine clone brush set to a 50% opacity to try to preserve the details as much as possible.

On areas that were a bit too smudged I used the lasso tool to select the area and added a noise filter of 1.1% to make them blend a bit more into the original picture. After I cleaned the image up, I duplicated the layer and set the blending mode to Overlay 85% to bring out more details in the sky. I wanted the buildings to remain as is, so I added a mask to the layer and painted them out.

I’m a big fan of highly saturated colour, so I increased the saturation +30 at 75% Opacity. This is where I’m taking a few leniences with reality. I think it adds to the surrealism of the shot, but you can experiment with it to find a good balance for you in your photos.

I wanted the clouds to stand out even more so I created a Curves layer and pulled the middle up to 136, 113. Then, I inverted the layer (command+i) and used a white brush to accent the white areas of the clouds. I repeated this with a Curves layer set to 101, 138 to accentuate the darker clouds.

I then imported the photo back into Lightroom by saving the file. For the final touches, I increased the Clarity +11 (to give the bridge a bit more contrast and sharpness), reduced the Noise a smidge by tweaking Luninance +15 and added a Vignette -11. I always add a subtle vignette to all my photos to draw the eye into the centre of the image.

Before: RAW image straight out of camera

After: Processed with Lightroom and Photoshop
San Francisco Rainbow over the Bay Bridge

Hope this helped you get a bit of insight behind my work flow and how I created this image. Processing is subject to personal taste, and what looks like the perfect image to me might look like a hot mess to someone else. For me, vibrant colours, high contrast, and emphasizing certain eye catching points in photos is part of my photographic style that I’ve developed over the years. :)

My view of the Lunar Eclipse, December 2010

14 Comments
Dec 23 2010

My view of the Lunar Eclipse December 2010
5DMKII + 100mm f/2.8, 2.5sec at f/4.5, ISO 640

Yesterday, I ran outside with my 5DMKII and my tripod to grab a shot of the lunar eclipse at midnight — half in pjs and wearing a beaver hat. :P
It was so foggy and cloudy that it took Pete and I about 15 minutes to find the moon. We were about to call an “epic eclipse fail” when the cloud cover broke, and the moon appeared behind my building…

I darted under my building and pointed my longest lens, the 100mm f/2.8, straight up at the sky. I cranked my ISO to 6400 and used live view to focus on the moon and frame in the building. Then, I switched back to camera view and decreased my ISO to 640 and used a shutter release remote to snap this. The moon was only visible for about 5 minutes, so I only got about 10 shots. I did briefly think what I would have gotten with this 800mm I got to fondle at Canon Press room at the 2010 Olympics…

If you snapped a shot of the Lunar eclipse, please share it in the comments, I’m really interested to see your shots!

Mostly Lisa’s Last Minute Holiday Shopping Guide for Photographers

18 Comments
Dec 19 2010

For those of you procrastinate on holiday shopping until the last minute, I understand your pain. We are indeed kindred spirits.. :P Here is a quick list to hopefully help you find some excellent photography gifts.

1. The Canon S95 ($369)

This little compact camera will knock your socks off. Excellent low light capabilities and great sharpness and vibrancy. The price fluctuates a lot on Amazon, so check it on B&H and Adorama as well.

2. Blackrapid RS-W1 Camera Strap for Girls or the RS-7 for Boys ($58)

I have used Black Rapid straps for the past two years and my neck personally thanks me on a daily basis. I couldn’t live with out this strap. Plus, the new girlie model looks much better with evening wear :P

3. Canon 50mm f/1.4

My first lens and one of my favourites. Great for portraits and food shots. A lot of new parents love this lens for baby photos. Tack sharp and super light to carry. If the $400 price tag is too much, get the 50mm f/1.8. At $100 it is a steal for a f/1.8 lens. If you shoot Nikon try their 50mm f/1.4.

4. Canon 100mm f/2.8L $879

If you have the $$, this lens says “I love you” on so many levels. This lens is one of the most beautiful lenses I’ve worked with. A must for photographers that love macros. It also works as an amazing portrait lens.

5. Moo Postcards ($19.99 for 10)

An excellent sentimental gift from one photographer to another or someone special. I just made postcards of my Disneyland trip and they turned out sensational. You won’t be able to get these before Xmas, so make an IOU for the New Year.

6. Wescott Collapsible Umbrella Flash Kit ($69)

For $69 this is an excellent off-camera flash kit. It’s $50 off right now, so it’s a great time to buy it. I’ve been really happy with my new lighting set-up from Wescott, so I highly recommend their stuff.  :)

Lisa's new Manfrotto 055CXPRO3 tripod!

7. Manfrotto 055CXPRO3 Carbon Fiber 3 Section Tripod $400

This tripod has changed my life. I have nearly dunked my dSLR into a river several times because of a crappy tripod. It really is an investment for keeping your camera safe. This tripod is so secure, even for bigger lenses and light to carry for a massive tripod. If $400 seems too steep for a tripod, then try the Manfrotto 190CXPRO3 ($259). It’s a bit more weighty, but still a great tripod.

8. Manfrotto 498RC2 Ball Head with Quick Release $129

Again, another recent purchase I couldn’t be happier with. It’s not a super expensive ball head, but it works excellently and the quick release is a game changer. You can mount your camera in seconds and release it even quicker.

5dMKII video set up

9. Rode VideoMic Directional Video Condenser Microphone ($149)

This is the best lightweight directional mic out there. Great for shooting videos with the 7D or 5DMKIIs. Improves sound quality 10 fold. I’ve had mine for over 3 years, throughout the 2010 Olympics, and it’s still one of my most used pieces of gear.

10. Canon 430EX II Flash ($265) or the Nikon SB-600 ($219)

If you are thinking of doing portrait work or shooting events, you need a flash. The 430 is smaller and lighter than the 580EX and works well as an on-camera flash and as a second flash for off-camera strobist stuff. I have used it as a main strobe for portraits as well. I can’t speak for the Nikon version but David Hobby likes the Nikon SB-600 so I guess it’s good. There is a newer model, the SB-700 ($259) that’s worth a look as well.

11. Lumiquest LQ-119 The Softbox III ($38) AND the Sto-Fen Omni-bounce ($13)

Both are essential for an event photographer! I’ve been using an Omni-bounce for events and personal photos — like my trip to Disneyland. The Omni works great for shots of one or two people, but isn’t great for big groups, which you get a lot of at conferences and weddings. This is why you need something a bit beefier like the Lumiquest Softbox to direct nice soft, diffused light on your subjects!

12. Rosco’s Strobist Collection, 55 Piece Gel Filter Kit ($10)

Flash light generally makes people look like the undead, so slap on a nice orange gel and everyone will look like they just got back from a week in Hawaii. As well as being corrective filters, you can also use these gels to create fun and cool experimental photos.

Wescott TD5 Spiderlite

13. Spiderlite TD5 Head ($363)

I just got one and I love it. Continuous light is perfect for video and great for stills. If you are a photographer that does both video and stills, this is an excellent lighting head. The daylight balanced fluorescents stay cool even when they’ve been on for hours. And I know because my boyfriend is currently using one as a lamp :| Not impressed.

14. Adobe Lightroom 3 ($299)

In all honesty, this is one of the best gifts you can give a photographer. My pictures would not look nearly as good without Lightroom. It’s noise reduction software alone is worth the price. I do almost all my RAW processing in Lightroom before I work on my shots in Photoshop. You can do almost everything in Lightroom, including dodging & burning and painting and trust me once you learn how to unlock the power of Lighroom — photographic glory will be yours!

15. Photojojo’s Bokeh Kit for dSLRs ($25)

Seriously fun and very addictive for bokeh nuts especially with a tree full of sparkly lights nearby…

16. Oh Snap! Camera Necklace ($18)

Cute little gift for the female photographer in your life.

Those are my recommendations without any affiliations or freebees :P, so these are all things I use and love. I hope my list helps ease your holiday shopping whoas a little or maybe gives you some ideas to put on your wish list for 2011!

5 Tips for Taking Great Vacation Photos

67 Comments
Nov 27 2010

Mostly Lisa on Paradise Pier, California Adventureland

I just finished processing my snaps from my fabulous Disneyland birthday weekend and I thought I’d share some tips and tricks for getting great vacation photos.

As a die-hard photographer, I understand the tendency to want to capture every single moment of life, rather than experience it. While this will result in more photos of your trip, it may not result in the best photos. After a day of continuous snapping and being asked to smile and pose, even the most enthusiastic subjects will look like annoyed-looking grumps in your photos.

Fireworks above Sleeping Beauty's Castle, Disneyland

Instead of continuously shooting throughout the day, pick three or four times for posed family photos in front of main landmarks, and casually snap candids the rest of the time. Know when to put away your dSLR and just enjoy the day.

Disneyland Lollipop Bokeh
Taken while Pete was distracted by brightly coloured sweets. :)

All this goes out the window if there is amazing light. In that case, give your kids $10, point to the nearest ice cream store, and say, “Yay!! Ice cream!!” I find I can capture a lot of great shots when people are distracted with food or shiny things. I call it the “distract and snap” method.

Pete & Mickey PretzelOh look! A Mickey pretzel!

2. Pack the right gear

Oh Hai Disneyland!
5DMKII + 16-35mm + 430EX with an Omnibounce

On this trip to Disneyland, I brought minimal gear with me to the park because I knew that I would be trekking around a lot and going on bumpy, wet and generally gear-unfriendly rides. I brought my 5DMKII with the 16-35mm f/2.8, 430EX flash, Canon SD 1300 point & shoot, and my iPhone 4.

Pete in front of the Matterhorn, Disneyland
Pete waiting for the Monorail in Tomorrowland.

I only brought one lens because I find that I can capture great scene shots at 16mm and great people pictures at 35mm. Plus, it’s relatively small and unobtrusive. A 35mm, 24-70mm or a 18-55mm kit lens would work as well.

View from the Grand Californian
View from my hotel room at the Grand Californian.

If you are missing a zoom lens or wide angle, use a point and shoot or phone to grab these shots. Remember it’s all about about capturing moments, not perfect photographs.

2. Bring extra memory cards & batteries

Esmerelda, Main Street, Disneyland

I usually have 4 X 8GB cards and an extra battery for my dSLR on me at all times. I tore through all of these on this trip, especially when I was taking video. So depending on what you are shooting, I would recommend having at least 4 cards with you, if not more. Always pack an extra battery and make sure you charge your phone the night before.

Woody Vinylmation
Toy Story’s “Woody” in Vinylmation store.

3. Capture the story

While it’s great to capture the big breathtaking scenic moments of your vacation, try to capture all the seemingly mundane moments in between to connect all your images into a story of your trip.

Mickey Mouse Waffle

Snap a picture of your breakfast, the view from your hotel window, your family getting ready to go out, your boyfriend checking his feeds during dinner :-|, or any little candid moment you’d like to remember.
Pete Cashmore getting his RSS on :P

I find that these shots are the ones I really cherish, because they remind me of my experience, rather than the place itself. I love this shot of my epic R2D2 “Mostly Lisa” Mouse Ears getting made.

My R2D2 Mickey Ears getting made

MostlyLisa's R2D2 Mickey Ears

4. Capture the entire scene

Paradise Pier, California Adventureland

Always take a step back and capture the full scene. It’s a good opportunity to actually focus on your photography for a moment. I usually try to grab a few good shots when I’m waiting in lines for food, transport or Space Mountain :)

Space Mountain, Disneyland
Space Mountain!

To maximize your photo taking, set your camera to burst mode, so you can fire off a bunch of shots really quickly. Another way you can increase your chances of getting a great shot is by bracketing the exposure to +2 and -2 EV. This way when you fire off three shots in burst mode, you get three shots of varied exposure: 1. Over-exposed; 2. Normally exposed; & 3. Under-exposed.

Mark Twain Riverboat, Disneyland

5. Don’t forget to get in the picture too!


Cotton candy & magic hour in California Adventureland.

There are so many times when I come back from a trip and realize there are no pictures of me, almost as if I wasn’t there. I know most photographers hate being photographed, but your loved ones and demanding Facebook friends will appreciate a few pictures with you in them :P Before you pass of your camera, make sure it’s set up correctly so that anyone can just click the shutter. I usually set up the frame and settings on someone and then swap with that person, so all my settings are correct.


Point and shoot shot of Pete & I after a ride on Indiana Jones.

I’m not keen on strangers handling my dSLR, so if I want a shot with me and someone, I’ll either set up my point and shoot on a little gorilla pod and use a timer or just hand hold it. NB. Hand holding a dSLR is not recommended unless you’ve got the guns to support it :P

Mickey Mouse Toys at Disneyland

I look forward to seeing all of your shots of the upcoming holiday season!!!

Cleopatra’s Needle, Central Park, NYC

7 Comments
Oct 8 2010

Cleopatra's Needle, Central Park, NYC

5DMKII + 16-35mm

What a fabulous day in NYC. I have to say that I am falling hard for this city, especially Central Park. There is something sincerely breathtaking at every twist and turn of the path….

And then the sun peaks out behind the clouds… and for one brief second you hold your breath, click the shutter button, and hope that your settings were perfect… or close enough for Photoshop to make them look perfect :P

About the Obelisk (Oldest man-made structure in Central Park):
Cleopatra’s Needle is the popular name for each of three Ancient Egyptian obelisks re-erected in London, Paris, and New York City during the nineteenth century.

The London & NY ones are a pair made of red granite, stand about 21 metres (68 ft) high and are inscribed with Egyptian hieroglyphs. They were originally erected in the Egyptian city of Heliopolis 1450 BC. The inscriptions were added about 200 years later by Ramesses II to commemorate his military victories.

Twitter | Blog | Portfolio

8 Things to Inspire You to Keep Shooting & Sharing Your Photography

36 Comments
Aug 5 2010

Barry the Cowboy & Jesse the horse

I shot this image of a silhouetted cowboy and a horse at sunset over a year ago. At the time thought is was kind of cool, so I shared it on Flickr. A year later, I received an email from Penguin saying they’d found my image on Flickr and would like to use it for the cover of a new book! Yesterday, a cheque in the mail arrived. It’s my very first book cover!

What shocked me was that somebody actually paid me real money for a experimental shot that I took for fun and for free. I wanted to share this story with you because it really hammered home some really important points about the nature of the photography business in this new digital and social age and all the things that are possible for someone with no training, little money, and a strong passion for taking great photos.

  1. You can get great shots with any camera: I shot this with my trusty Canon Rebel Xti (400D) with a basic kit lens. The quality was good enough to print. Never let your gear limit you, instead learn to master what you’ve got and try to the best possible images you can.
  2. Even iPhone shots are good enough to print: We are seeing more and more publications accept images shot with an iPhone. The most recent MacWorld Cover was shot with an iPhone 4. F-Stoppers shot an entire fashion shoot with a 3GS. Additionally, when I was reporting on the 2010 Olympics for the Vancouver newspaper, The Province, they posted an iPhone 3G photo taken of me and a very large fry on the front page of the paper. They continued to use my iPhone shots in the paper many times.
  3. The more you shoot, the more you learn, the better you get: I feel like I’ve come a long way since that cowboy shoot and if it weren’t for that photo session and the many sessions after that, I wouldn’t be able to take the shots I take now. I honestly didn’t have a clue how to do anything technical when I started out. I often made big mistakes and took crummy photos. Instead of feeling bad when you take a poor photo, analyze it and try to figure out why it’s poor and how you can improve your skills for next time.
  4. Most learning happens by “just doing it”: I haven’t taken a single photography class or read a photography related book cover to cover. I learnt everything I know by doing and doing until I got it right. When I couldn’t figure something out something technical, I’d call other photographers, connect on Flickr, or dive into Strobist for a week.
  5. Other photographers are your greatest allies: Whenever I meet another photographer like Ken (pictured on left) and Scott (right), I completely barrage them with questions about gear, lighting, techniques, etc. I find most photographers are completely open to sharing information and are wonderful shoulders to cry on when you are lacking inspiration. You can meet tons of photogs on Twitter, Flickr, and Facebook. Share your ideas, go for photo walks and garner inspiration from them.
  6. Believe in yourself and your photographic abilities: We all have bad days, unproductive days, but it’s the people that keep plodding through the difficult times that end up succeeding. I’m very hard on myself and my photography, and sometimes I’ve completely abandoned it for months because I didn’t feel like my shots were good enough. Now, if I’m having a bad day with my 5DMKII, I’ll switch things up and shoot with my iPhone. I find by taking the pressure off and just shooting for fun, I can overcome a lot of my self-critical negativity. At the end of the day, we shoot because we love photography, not to create perfect images.
  7. Share your photos: If I hadn’t uploaded that cowboy photo to Flickr, Penguin would have never found it. It’s that simple. The greater distribution your photos have, the more people will see them and the greater opportunities you have to publish or sell your images. So start sharing your shots! Plus, it really helps to have others both praise and criticize your work.
  8. You can make money with your photography: It’s not easy, but it’s definitely within your grasp. I did it with no training, just hard work and perseverance and so can you! I’m going to do an expanded post on this topic soon, because I know what a battle it is to get paid for professional photography work when everyone’s Uncle Jim considers themselves a Pro photographer.

Until then start with Step One: Get out and shoot. Step Two: Share your photos! I want to see everyone posting pictures on Twitter, Flickr, Facebook, Tumblr & their blogs. Can’t wait to see your shots!!