
Whether you are snapping pictures of your cat, daughter or a glamorous super model the key feature in any portrait is the eyes.
1. Set your Aperture at f/2.0-5.0.
This will give your portrait a nice depth of field with the eyes in focus and falling off around the hair line. If you are shooting in natural light your f-stop will be dictated by how much light you have. Just watch that if you decrease your aperture to < f/2.0 that you are able to get both eyes in focus which is tricky if your subject isn’t straight on.
2. Focus on the middle of the pupil.
It’s very easy to catch focus on the brow or eyelashes. If you can’t grab focus on the eyes, you need more light. Need help trouble shooting light? I’ve got a post about that!
3. Ask your subject to tilt their head down.
This makes the eyes look bigger and is a more flattering angle than an up-the-nose angle. If you can see nose hair, you need to find a better angle. Subjects usually respond to a little direction like, “Tilt your chin down”. Then, guide them into the most flattering position for their face.
4. Shoot from above.
Again this makes eyes look bigger and faces look thinner. If your subject is taller than you, find a curb or a step. Also, I suggest that you head to IKEA and grab a small step stool for $10. I keep one in the back of my truck, so I always have it on hand for shoots.
5. Light the face with soft, even light.
Harsh light is bad. Shadows are worse. Dappled light is the worst. So, give your subject some lovely soft, even light. They will look better and you won’t have to try to correct your light in post. If you are shooting outside, try to shoot either in the morning or in the late afternoon when the light is soft. If you have some cloud cover then you might be able to shoot anytime as long as there is enough light.
One thing you should purchase is a collapsible reflector. I use a 22″ circular 5 -in-1 reflector. It’s reversible covers give you the option to reflect with silver, gold, white or block light with black. Brand isn’t really important just go to any photography store and buy the cheapest one. If you are financially challenged at the moment, go to your local craft store and buy two large foam core boards in white for about $2. These work great as reflectors.
If you have any tips or questions, head to the comments!
uberVU - social comments
November 9, 2009 at 1:31 PMSocial comments and analytics for this post…
This post was mentioned on Twitter by mostlylisa: http://shak.in/35 How to take a better portrait. Say cheese!…
Mike
November 9, 2009 at 1:36 PMGreat site and helpful info! I’m just getting into portraits and I didn’t know about tilting the head down…I’ll have to try that.
A few additional comments on aperture
If you are using a full frame instead of a crop frame, you can achieve much better blur with a smaller aperture.
Another thing to consider is if you are using zoom vs. prime lenses. If you shoot f/4 at 24mm vs f/4 at 105mm with the same zoom lens you will get much better blur at 105mm.
Stuart Webster
November 9, 2009 at 1:53 PMThanks Lisa, I’ve got a shoot on Wednesday for my work team day :& The day is at a hotel any suggestions on getting that extra hight when taking an Ikea step on a flight to Scotland isn’t an option :)
clarke
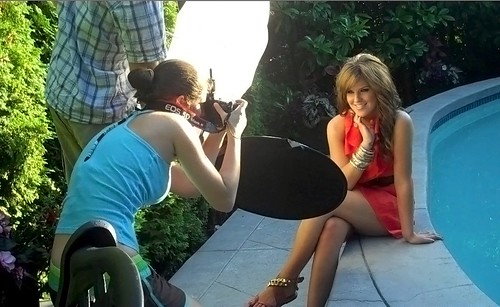
November 9, 2009 at 1:59 PMwhat photoshop tweaks do you make post shooting? As noted by the more vibrant colors(between the bottom shot of you shooting & the final product in the top left matrix)?
Aimee Greeblemonkey
November 9, 2009 at 2:51 PMall great tips!
Jan Ole Peek
November 9, 2009 at 3:15 PMVery nice post, thanks for the tips, especially about the aperture setting!
Eric Fadden
November 9, 2009 at 4:51 PMDon’t forget the importance of that telephoto lens either. While most simply see it as a way to bring far away things closer in what they don’t know is that you can also use them to compress your background.
If I shoot you at 24mm and f/2.8 and then I back up about 6-8 feet and shoot you at 150-200mm and f/2.8 the difference will be *huge*. It’s all about blowing that background out of focus and while a wide open aperture is key to controlling depth of field you have to compress that background too.
Just my $0.02.
Meera
November 9, 2009 at 6:36 PMthanks for the tips, esp your lighting techniques! :)
Peter
November 10, 2009 at 2:38 AMSweet. No I have a reason to get a reflector.
Clint
November 10, 2009 at 7:40 AMMy heart is warmed to know that you drive a truck.
Cf
Rick Rouse
November 10, 2009 at 12:16 PMGreat tips Lisa.
Jennifer
November 10, 2009 at 12:33 PMGreat tips Lisa. It was a very enjoyable read. I like the tip about tilting the head down. It is amazing the differences that small changes make!
Shannon M
November 10, 2009 at 9:59 PMHi ya Lisa! I always appreciate the tips you pass along. You’ve mentioned before how you’re self-taught to which I can relate. I was wondering how much control you take over the shot setting by shooting in manual mode or aperture? Is there any reason you prefer one setting verses the other for whatever reason (i.e. shutter speed, effect, white balance)?
Chris Hutchcroft
November 13, 2009 at 7:35 AMGreat tips, some seem so obvious but obviously I’ve missed them, especially the shooting angle tip. I have so many of those Ikea step stools I should use them :)
Matt Larsen
November 14, 2009 at 9:22 AMUsing a flash mount so that the flash you’re using isn’t an inch above the lens helps immensely as well.
forex robot
November 18, 2009 at 10:09 PMNice post & nice blog. I love both.
Vivek Mohan
November 19, 2009 at 8:36 PMLisa…this is easily the best article i’ve read in quite sometime… am planning to try out portrait photography this weekend…it’ll be great if you can pass on your expert comments on the pics I would be sharing!
ram
November 23, 2009 at 5:18 AMHi,
Superb tips.I really enjoyed the post.Tip regarding aperture setting helped me a lot as it was new for me.Thank you for sharing..
ksuwildkat
December 7, 2009 at 7:41 AMThanks for the great tips. My question – Do you ALWAYS blind your model with reflectors or am I doing something wrong? It doesnt matter how much or little light I am reflecting, my models feel blinded whenever I get the light “right.”
subcorpus
December 9, 2009 at 1:26 PMnice list of tips …
thanks for sharing …
Photography Techniques
December 14, 2009 at 10:20 AM[…] Lisa, who is mostly fabulous, has a great article on taking better portraits . She should know. She’s been in front of the camera as much as behind […]
Jason Collin Photography
December 17, 2009 at 9:52 AMThanks Lisa for these short and to the point portrait tips. I will put into effect the shooting from above tip in my next shoot as my wife already has the exact same IKEA step stool that she uses in the kitchen!
I’ll ask for a reflector for Christmas….and an assistant too I guess!
wedding photography sydney guide
December 20, 2009 at 11:22 PMHey there Lisa, greetings and like to add what an excellent and informative site you have created. Your tips are great and educational. Will bookmark this site! Cheers from Perry
european
December 28, 2009 at 4:05 AMhello
how about copyright on pictures which are published on internet.
When a person have a account and the picture is an animal there is no doubt
the difference appears when the picture is a person and the understanding of law
Common LAW — european law not english spoken countries
Overcoming the fear of high ISO, and shallow depth of field. « Optic Bard
January 15, 2011 at 3:02 PM[…] lower than the recommened 5.6. When I did, I wasn’t happy with what I got. Recently I read on mostlylisa that for portraits you should use between F2.0 and F5.0. Why could she take such awesome […]
15 Photography Project Ideas to keep you shooting every day! | MostlyLisa.com | Photography tips & inspiration
January 21, 2011 at 4:16 PM[…] am most passionate about taking portraits. From candid street photos shots, to strobe light lit creatives, to magic hour back lit shots, the […]
kulu
September 24, 2012 at 9:43 AMThank you indeed
Rely I don’t have word related to thanx coz I got large no. of tips from you . You are creative person
Tnhank you again
Tom C
August 28, 2015 at 8:37 PMThis is without a doubt the greatest article entitled How to Take Better Portraits by Lisa Bettany that I’ve ever read!!!one